Sunday, June 6, 2010

Another Mod Podge Makeover


I am back after a pretty long time but I am back with a small project to make up for it.Nothing special, but since I have done pretty much nothing crafts-wise this would have to be it.

My colleague at office has been using a cheap wooden paper /magazine rack thingy to store her office papers and I have been dying to make it pretty.Ever since I have discovered Mod-Podge,all I do is look at different surfaces and want to "cover 'em up".Does that happen with you?Anyway I asked her and she happily gave it to me to "beautify" it and that's what I did.

Saturday, May 8, 2010

Quilled Artwork

Hi there,

I picked up some small canvases on my regular trip to my favourite stationery shop and was trying to figure out what to do with those.I was too scared to attempt to try my hand at drawing or painting ,so I figured that I will go with paper quilling.To tell you the truth,I am a novice at this quilling thingy too but I so love the different things people make and wanted to try my hand at something similar and came up with this.


I started out with the grand idea of making a wrought iron sort of window box but it ended up looking like a planter.Never mind,it's not too bad I think.Since I am pretty new at this, I know a very few basic types of flowers . I just made some rolled and fringed flowers and some quilled and rolled roses and called it a day.For the background,I painted the canvas a pearly yellow using acrylic paint and lifted off some paint using a paper napkin.You can see that there are places where I lifted off too much but I don't intend to fix it.Making these flowers and scrolls was pretty easy but assembling them was a pain.I still think it's worth it though.The beauty of quilling is that whatever you make, it ends up looking pretty.At least that's what I think.I am going to make one more flower themed artwork using paper quilling anf gift it to my mom.She is sorely in need of something on her walls.

Here's a closeup


I also attempted to try staging a photograph.See..


What do you think? I dunno if this looks good or bad.All I know is that I suck at photography.:-(

By the way ,the kettle that you see was bought on an impulse and I just can't make up my mind whether I like it or not.I intended to use it as a flowrerpot but now I want to try my hand at painting it some other colour and using it as a decoration.Can't make up my mind though!

To learn more about quilling,see these videos on youtube:


Submitted for The Girl Creative

Also participating in the Visit thecsiproject.com
See you later

Cheers
Sumi

Sunday, May 2, 2010

Polkadots and Paint

Hiya,

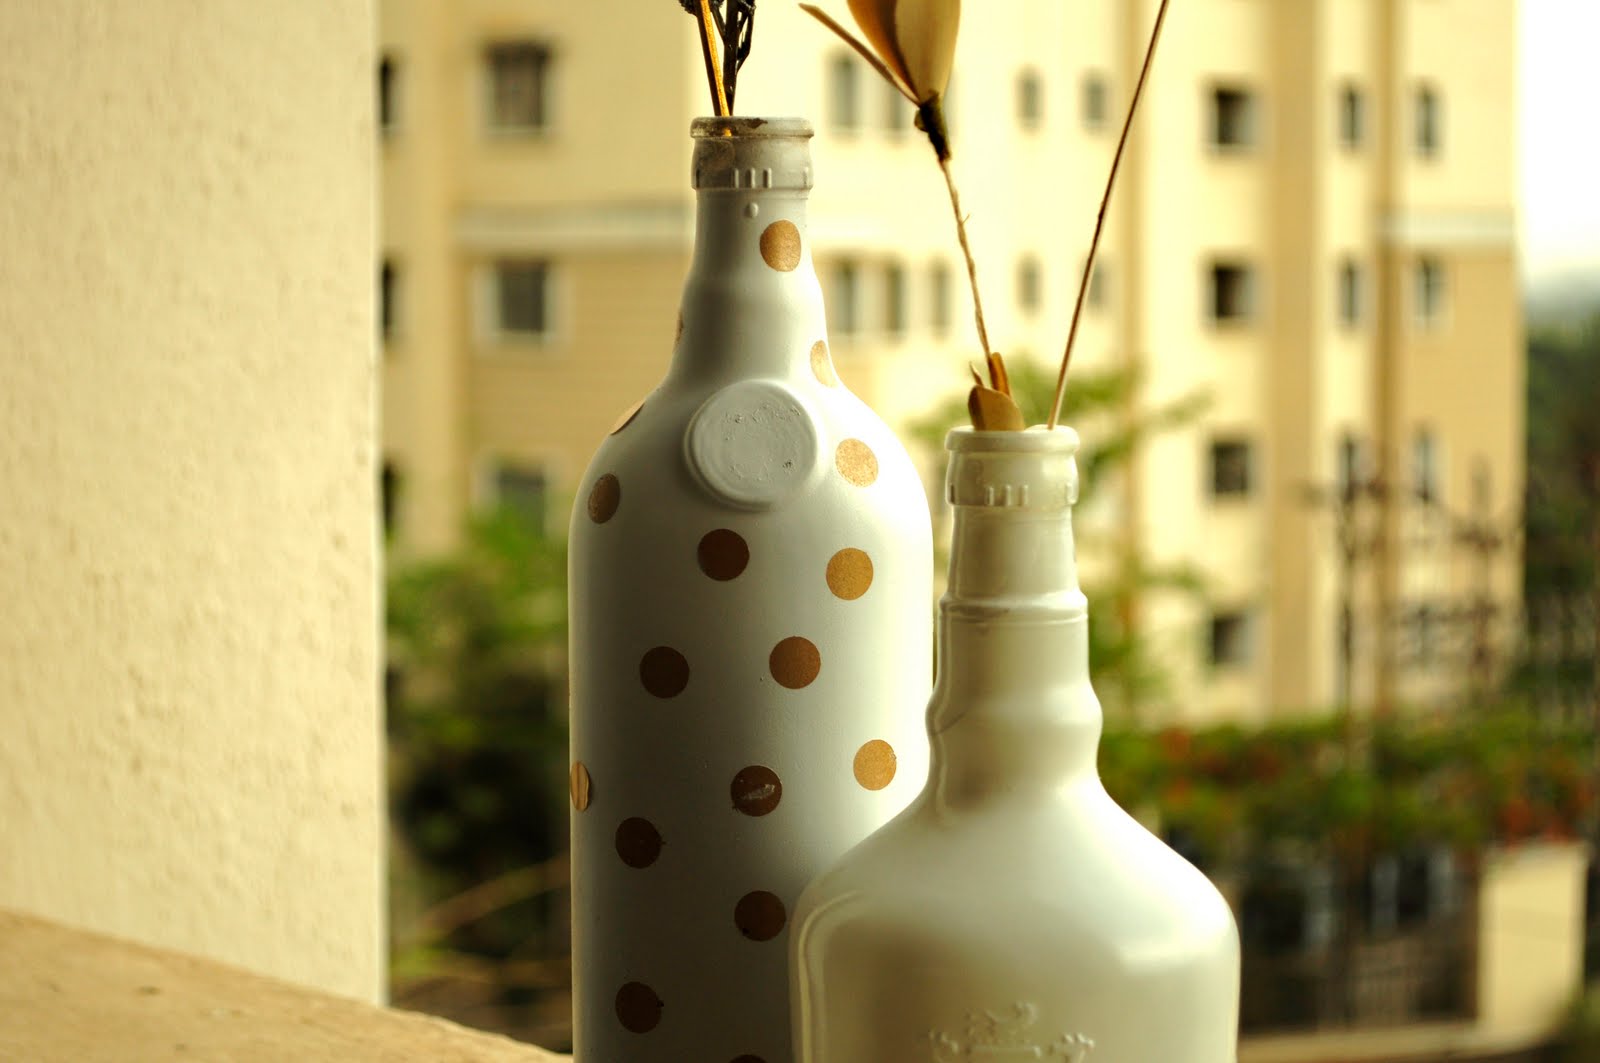
I finally woke up after a long long time and indulged myself with a very very quick project.I have noticed a lot of bloggers who have been attempting to paint glassware and it completely fascinated me.I was a bit scared too, to be honest.I suck at using a spray paint.I envy people who just pick up a can and spray away to glory.Mine always turns out streaky and uneven.Anyhow,today I decided to overcome my apprehensions and got down to try it out.I had a few nice and shapely empty whiskey bottles and I conducted my experiment on those.

And.. I am happeeeee!It was easy ,quick and the results were good.Atleast I loved it and so did my mom.We may be prejudiced of course! :-)

So here's what they look like.Do not have a before picture.I was so convinced that it will be a disaster that I didn't bother taking a before picture.


It was pretty simple.I removed the labels from both the bottles.Painted one all white but used a very thin layer of paint.The other one I first painted a bronzy gold.Let it dry.Then I stuck some small circular lables which I got from a stationery store and stuck it on to the bottle randomly.Painted the bottle again with white paint,let it dry and removed the lables.

Yes I could have painted on the polka dots with a brush but I don't trust myself to paint equal sized dots ,clumsy as I am.This solutions worked for me.

Here's how it looks, up close .


Me likey ,me likey very much.:-).Hope you do too.

Showing off at  Making
And Madebyme Monday at Creative2xmom

Cheers
Sumi

Sunday, April 4, 2010

Tshirt Refashion

Hiya,

I have been doing absolutely NOTHING for the past two weeks.Just going for work,waiting for the day to get over ,counting days till the much needed weekend..taking one day at a time..Sigh..Consequently no new craft attempts lately.Shame! But ! I do have something to show.I did it a couple of weeks back as a random urge to do something hit me.

I have been seeing so many people doing so many awesome things to refashion their clothes,so I decided to join the bandwagon.I am in love with the different fabric flowers that such a huge part of the craftworld is interested in and decided to make some of my own.I had to think of some gifts for my friend who was leaving town forever, so I thought I will do some t-shirt refashion for her.Here is what I came up with.

That's my mom holding the tshirt for me .Sweet.:-)

This is nothing but simple rolled fabric flowers made out of some scrap fabric that I had lying around.There are thousands of tutorials on this so I don't think I need to explain how it is done.Ignore the threads hanging about on the shirt.I promise I did clean it up and ironed it before gifting it.

Here's a closeup


I also made another one.I fell in love with the bright vibrant fresh green of the shirt and had to buy it.Nobody else in my family understood my excitement over the colour, mind you.Well not that I care !!

To add some extra pizzazz to this shirt I used wooden beads that were attached to an old shirt of my niece and look how nice it looks!!! At least I thought it was pretty.


Note that I did not hide the logo on the tshirt.Small oversight but I hope my friend didn't mind too much.Heh heh.I stiched or rather my mon stitched the beads on to the shirt but people who can't sew can use a fabric glue too I think.


I love it.Simple and easy.Hope some of you do too.

Cheers
Sumi

Sunday, March 28, 2010

First attempt at Jewellery : Cheap and Easy

Hiya there,

Yes, I have been incommunicado again as usual but as I said ,with a full time job I don't really get a lot of time to spend here.Anyhow,though I have been not very active here ,I have not been idle.No sir .. or madam.

One of my good friends and colleague relocated to another city and I was busy making things for her as farewell gifts.Yes,I MADE gifts for her.Did not pick up something off the rack from a store and I am mighty proud of that.Pat on the back.:-)

First off was this necklace that I made out of saftey pins.Yes,you heard right!It was made of safety pins and tiny beads.Of course ,the idea is not original at all.It was stolen borrowed from here.Kelsi is a genius in my books.Such a brilliant idea and so easy to make.Totally loved it.Go visit the link and see the tutorial.

I will attempt to explain how it is made here for my friends who are too lazy to go blog hopping.

Basically,you need to have a chain,preferably a thin one.You will know why in a minute .
Safety Pins : Preferably all of the same size but you can experiment and used different sizes
Beads: Should be small enough to fit into the safety pin
Clasps and Jump rings: My chain already had those.I just used a plier to open the ring from one side and slid the safety pins


Step 1 : Open the safety pin and slide the beads onto the pin.The number of beads would depend on the length of the pin.Just make sure that you can close the pin after sliding all the beads.

This is what it looks like.


Slide the rounded end of the saftey pins into the chain and you are done.Easy!My friend loved it and wore it almost immediately and it does look great.Not tacky at all.See for yourself


If you visit the tutotial link,you will see that I followed the instructions to the T.I was in a hurry and did not have much time to experiment but I think adding different beads and some more interesting elements would add some more pizzaz for sure.

Cheers,
Sumi


Tuesday, March 16, 2010

Cute as a button!

Did I tell you that I love visiting the kids' section in bookstores.Yes I do and I love looking at the cute craft products there.While browsing through stuff yesterday,I came across something that I loved too much.I don't care if it's meant for kids.It was too cute to be ADULT about it.Notice how bad my vocab is !!Cannot think of any synonyms for cute!

Note to self : Buy a Thesaurus.;-)

Anyhow,So this is what it is

The box had some plastic frames ,preprinted mini canvases,cardboard backing for the frame and of course paint and a tiny paintbrush.They also provide small magnetic strips  for you to be able to convert these into fridge magnets.You can also hang it ,or use it just as a mini photo frame.


So here's what I did.Isn't it adorable???


Does this qualify as DIY if one has cheated????? I am too lazy to figure out how I could have done it without buying the product,but I think if you are clever enough ,you can figure out how to do this all on your own .I am thinking of making somtehing with quilling paper and attaching it to the frame.Let's see how that works out.For now this is going to my Fridge magnet collection.


P.S: Synonyms for "Cute",courtesy dictionary.com

Beautiful,Charming,Adorable,Delightful,Pleasant,Pretty,Dainty.Ambrosial,Captivating,Fetching,Delectable.I hereby proclaim that the above pic is all of these things.Hee Hee

Cheers !


Sunday, March 14, 2010

Blingin' it up!

Hiya There ,

Phew! I have been missing for a long time ,haven't I!! Not that the two people who actually read my blog are going to miss me much.:-).I really don't have a legit excuse.It's just plain ol boring day job and the stress associated therewith.By the time I get home,I am plain exhausted.BUT,to give myself credit ,I do make it a point of visiting other people's blogs to lap up all the crafty goodness... so much so that I spend more time looking at other people's projects than doing something of my own.

Anyhow,this weekend I finally motivated myself to do SOMETHING.Some days back Amy at Mod Podge Rocks featured a project by Selliz.She makes altered compact mirrors and all of them are mighty cute.Go check out Selliz's site here and you will find true inspiration.


I wanted to try making one immediately.Mine is nowhere close to hers in the detailing and gorgeousness but I still like mine too..:-)

I started out with an old battered compact mirror for the experiment.


A little bit of Mod Podge and a collection of my blingy stash and here it what looks like now..Pretty isn't it?


Sorry for the bad picture quality.This was late at night so no proper light.
I am still in two minds about  covering the whole lid up because of the visible scratches on the surface but for now this will do.

Cheers!

Submitted for :

Related Posts Plugin for WordPress, Blogger...